
Description
Everything Needed for One Roof Anchor Point — In One Kit
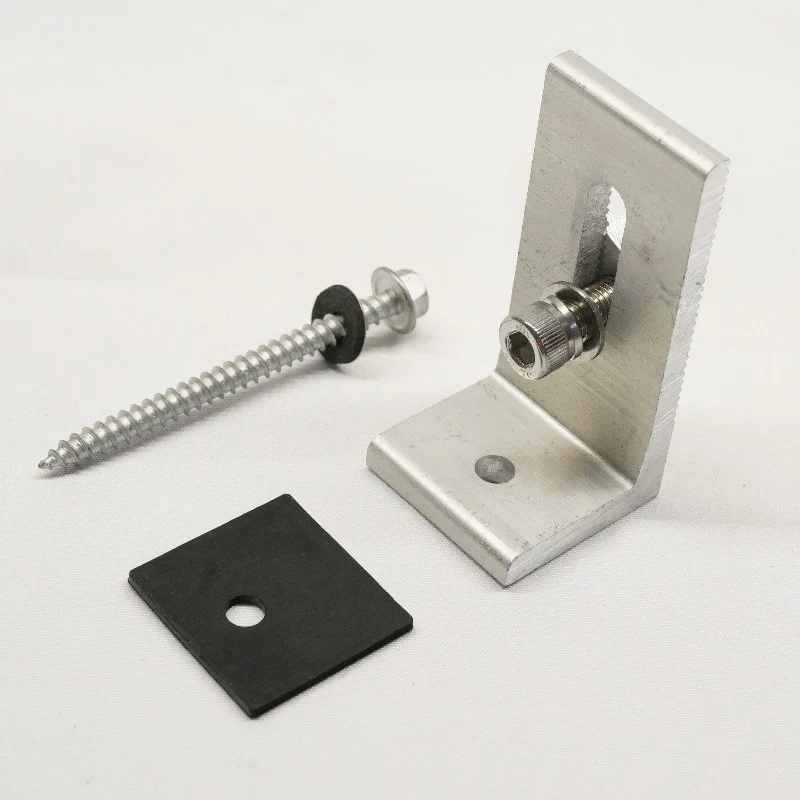
Most solar installers in Kenya know the frustration: you order L-foot brackets from one vendor, then realise you still need to source the M8 bolt, the wood screw, the EPDM gasket, the washers, and the nut from a hardware store. Three trips, three suppliers, and inevitably one component is missing the day you need it. The Bicity Solar L-Foot Screw Kit solves this by bundling every component of a roof anchor point into a single SKU — when you order N kits, you have everything needed for N roof attachment points with no missing parts and no hardware store runs.
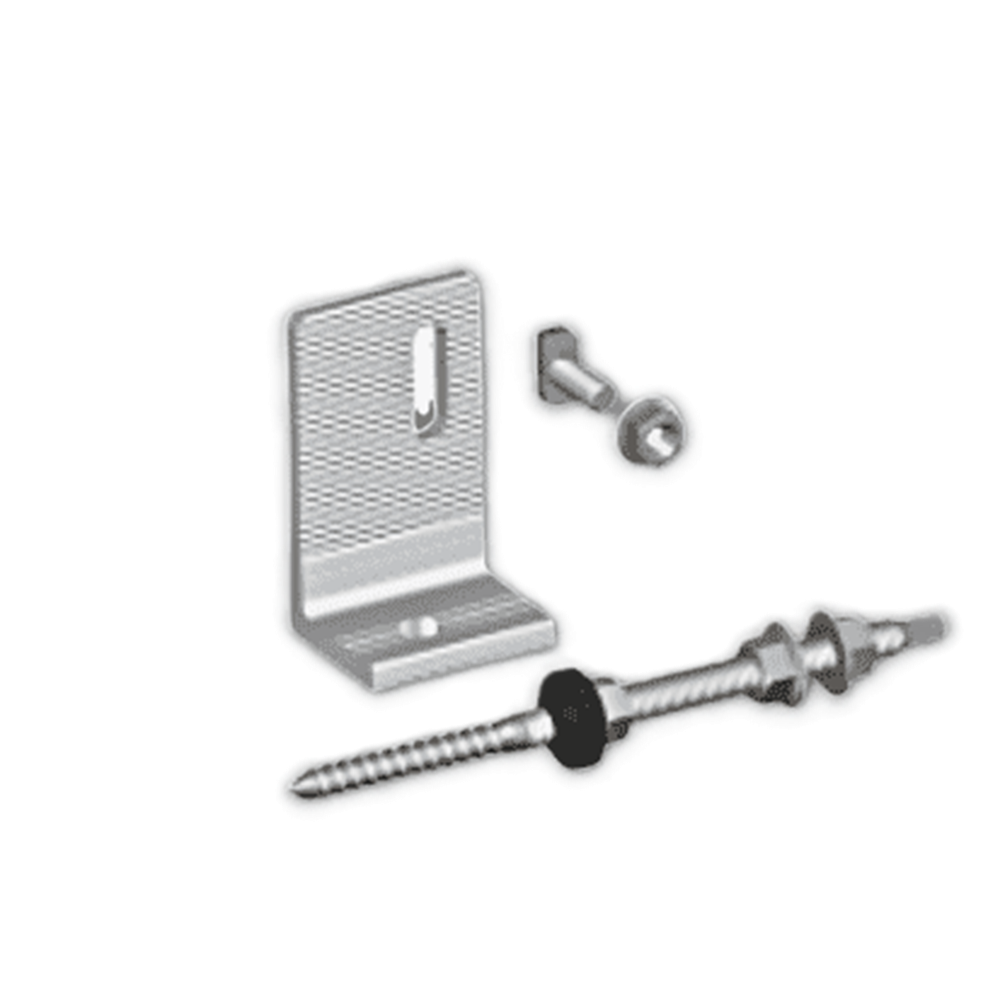
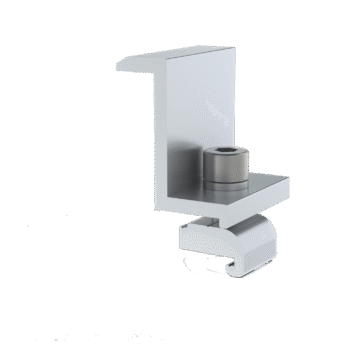
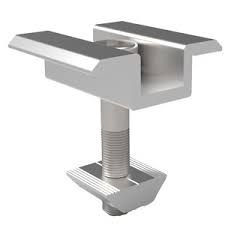
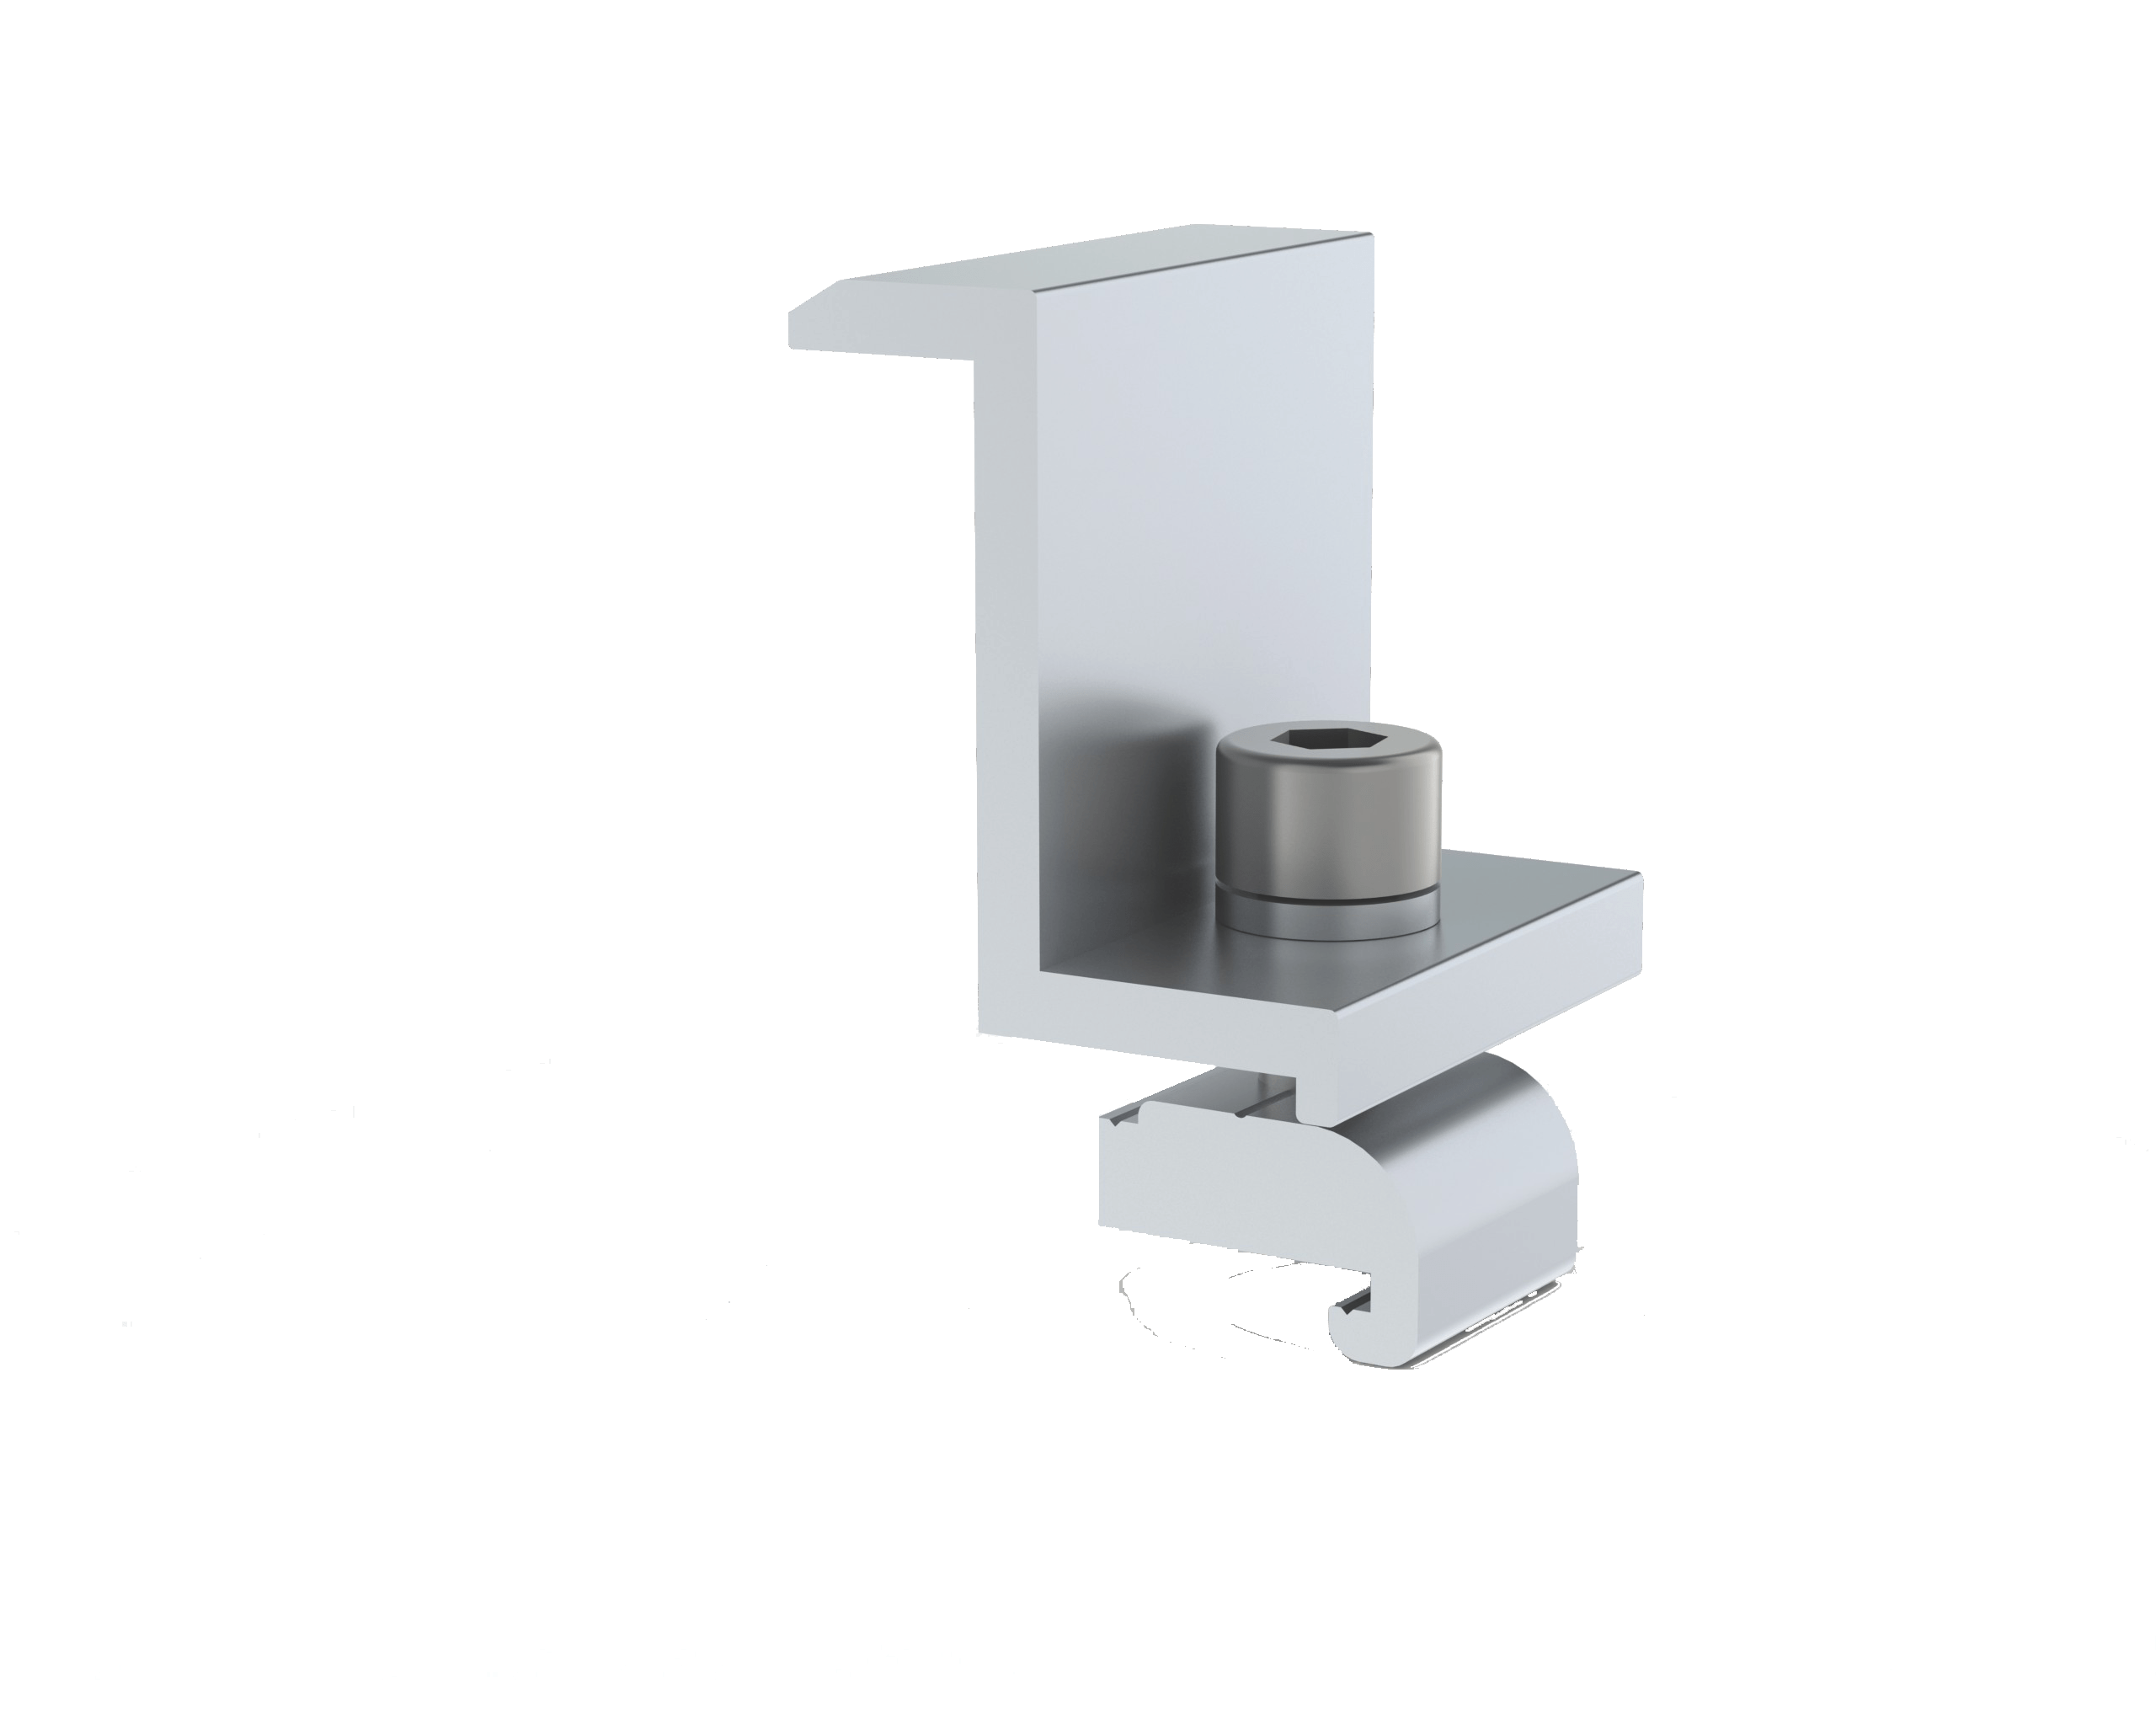
Each kit contains seven coordinated components that work together as a single fastening system. The Al6005-T5 anodised aluminium L-foot is the structural bracket that the mounting rail attaches to. The M8×25 stainless steel bolt secures the rail to the bracket via the rail’s T-slot. The flat washer and spring washer distribute clamping force and prevent the bolt from loosening over thermal cycles. The nut locks the bolt assembly. The EPDM rubber gasket sits between the bracket and the roof surface, sealing the penetration against rain water. The ST6.3×80 stainless steel wood screw (or self-tapping screw, depending on roof type) penetrates through the bracket, through the EPDM gasket, through the roof material, and into the structural timber or directly into the metal roof sheet for anchoring.
Why Each Component Is in the Kit (And What Each One Does)
Al6005-T5 anodised aluminium L-foot bracket
The L-foot is the load-bearing structural element. Al6005-T5 alloy provides approximately 260 MPa tensile strength — enough to carry the panel weight plus wind loads through 25 years of service. The “T5” temper designation means the aluminium has been age-hardened to its full strength specification. Cheaper L-feet sometimes use Al6063 (window-frame grade) which is approximately 35% weaker, leading to visible flexure under wind loading after a few years. The clean anodised finish creates a sealed oxide layer 10-15 microns thick that protects the underlying aluminium for the full installation service life.
M8×25 mm stainless steel bolt
The M8 bolt threads into the T-slot nut inside the mounting rail’s internal channel, securing the rail to the L-foot. The 25mm length matches the combined thickness of the rail wall (typically 2mm), the L-foot vertical leg (typically 5-6mm), and the spring washer (about 2mm) with thread engagement remaining. Stainless steel (SUS 304) prevents the bolt from rusting in Kenya’s humid and coastal conditions — particularly important because this bolt is rarely accessed after installation, so rust would make any future maintenance impossible.
Flat washer + spring washer
Two washers may seem like overkill, but each serves a specific role. The flat washer distributes the bolt’s clamping force over a wider area of the rail wall, preventing the bolt head from gouging into the aluminium. The spring washer (also called a lock washer) applies constant axial pressure to the bolt threads, preventing the bolt from loosening as the rail expands and contracts with daily temperature cycles. Without the spring washer, M8 bolts on solar rails typically loosen within 2-4 years of installation.
SUS 304 stainless steel nut
The nut threads onto the bolt below the L-foot, locking the entire assembly. SUS 304 stainless matches the bolt material — using a plain steel nut with a stainless bolt would create a galvanic cell that slowly corrodes the cheaper component. Same-material nut and bolt is the only correct specification for outdoor installations expected to last 25 years.
EPDM rubber gasket
EPDM (Ethylene Propylene Diene Monomer) is a synthetic rubber specifically formulated to resist UV exposure, ozone, and temperature cycling for decades. The gasket sits between the underside of the L-foot and the roof surface, sealing the penetration where the wood screw passes through. Without the gasket, every L-foot anchor point would leak rainwater into the ceiling space. EPDM was chosen specifically over silicone because EPDM maintains its sealing properties at the high roof surface temperatures (50-60°C+ on hot Kenyan afternoons) where silicone gaskets gradually degrade.
ST6.3×80 mm wood screw or self-tapping screw
This is the screw that physically holds the entire assembly to the roof. The 80mm length is sized to pass through the L-foot base (5mm), through the EPDM gasket (3mm), through the roof material (varies), and bite at least 40-50mm into the underlying roof timber for a secure anchor. For metal roofs without underlying timber, the ST6.3 self-tapping variant cuts its own threads through the metal sheet for direct anchoring. The 6.3mm shaft diameter provides substantial pull-out resistance — testing shows these screws hold approximately 1.5-2.0 kN of pull-out force when properly installed.
Roof Type Installation Guide
One of the kit’s main advantages is that the same SKU works across all common Kenyan roof types. The installation technique varies slightly by roof material, but the components stay the same:
Mabati (corrugated iron sheet) roof
The most common Kenyan residential roof type. Install the L-foot at the high point of the corrugation (the ridge, not the valley) so water flows around the L-foot base rather than pooling against it. The ST6.3×80 screw penetrates through the bracket, through the EPDM gasket compressed against the mabati ridge, and either into the underlying timber purlin (if the screw position aligns with one) or self-taps through just the mabati sheet (if no timber underneath). The EPDM gasket compresses against the mabati ridge to seal the penetration. Plan the L-foot positions during the pre-installation survey so most screws hit underlying timber for maximum pull-out strength.
IBR sheet roof
Similar to mabati but with deeper trapezoidal corrugations. Install the L-foot on the high flat surface (the top of the trapezoid), where the underlying purlin runs perpendicular below. The ST6.3×80 screw should land on a purlin position for proper structural anchoring — IBR sheet alone is too thin to provide adequate pull-out strength. Verify purlin positions during the pre-installation survey by checking from inside the roof space.
Tile roof (clay or concrete tile)
Tile roofs require an additional component: a tile-replacement hook or roof hook that wraps under the existing tile and anchors to the rafter below. The L-foot from this kit attaches to the top of the tile-replacement hook, not directly to the tile surface. The EPDM gasket may not be required for the L-foot connection on tile roofs (since the hook handles the waterproofing), but is included for cases where the bracket attaches to a flashed plate. Order tile-replacement hooks separately if your installation is on a tile roof.
Concrete flat roof
For flat concrete roofs, use the L-foot as an above-deck anchor with a concrete anchor bolt replacing the wood screw. Drill a 10-12mm hole into the concrete using a hammer drill with a masonry bit. Insert a chemical anchor or expansion anchor into the hole. Position the L-foot over the anchor with the EPDM gasket beneath. Thread the M8 bolt (or appropriate anchor bolt) through the L-foot into the concrete anchor. Seal around the anchor with a small amount of polyurethane sealant for additional waterproofing.
Timber-frame or shingle roof
For traditional timber-frame roofs with shingles or wooden tiles, the kit installs similarly to mabati but the ST6.3×80 screw can bite directly into a roof rafter through the shingle layer. Use the EPDM gasket compressed against the shingle to seal the penetration. Verify the screw position aligns with a rafter before drilling — drilling into the shingle space between rafters provides no anchoring and creates a leak point.
How Many L-Foot Kits Does Your Installation Need?
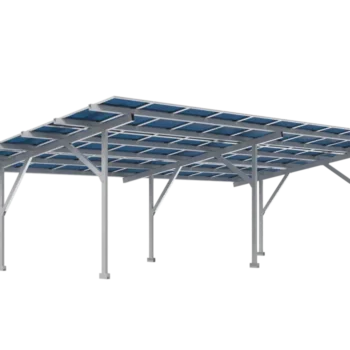
The general rule for solar panel mounting in Kenya: 4 L-foot anchor points per panel. Each panel sits on 2 parallel rails (top and bottom), each rail attaches to the roof at 2 L-foot points beneath the panel. So 4 kits = 1 panel’s worth of roof anchors.
| System Size | Panel Count | L-Foot Kits Needed | Notes |
|---|---|---|---|
| 1 kW | 2 panels | 8 kits | Minimum residential system |
| 2 kW | 4 panels | 16 kits | Small home system |
| 3 kW | 6 panels | 24 kits | Common residential starter |
| 5 kW | 10 panels | 40 kits | Standard residential |
| 7 kW | 14 panels | 56 kits | Larger home system |
| 10 kW | 16-18 panels | 64-72 kits | Large home or small commercial |
| 15 kW | 24 panels | 96 kits | Mid-commercial system |
| 20 kW | 32 panels | 128 kits | Commercial rooftop |
| 50 kW commercial | 80 panels | ~320 kits | Large commercial deployment |
For installations with longer rail runs that share L-foot positions between adjacent panels (which is rare but happens on some commercial layouts), the count can be reduced by 10-15%. For complex or unusual layouts, use our solar calculator for a more accurate bill of materials, or submit a quote request with your specific layout for a detailed component list.
Technical Specifications
| Specification | Detail |
|---|---|
| Product Code | MRC01 — Complete L-Foot Anchor Kit |
| L-Foot Material | Aluminium alloy Al6005-T5 (extruded, age-hardened) |
| L-Foot Tensile Strength | 260 MPa typical |
| L-Foot Finish | Clean anodised silver, 10–15 micron oxide layer |
| L-Foot Dimensions | Typical 70×40×40 mm with M8 mounting hole |
| Bolt Specification | M8×25 mm, SUS 304 stainless steel, hex head |
| Nut Specification | M8 hex nut, SUS 304 stainless steel |
| Flat Washer | M8 inner diameter, SUS 304 stainless steel |
| Spring Washer | M8 inner diameter, SUS 304 stainless steel |
| Wood/Tapping Screw | ST6.3×80 mm, SUS 410 stainless steel (chosen for screw thread hardness) |
| Gasket Material | EPDM rubber, approximately 3mm thick |
| Gasket UV Stability | Designed for 25+ year direct sunlight exposure |
| Wind Load Rating | Designed to support up to 1.5–2.0 kN pull-out force per anchor point |
| Compatible Bolt Sizes | M8 standard (kit configured); M10 variants available on request for heavy commercial installations |
| Compatible Rails | All standard solar mounting rails — 26×42mm, 30×40mm, 35×42mm profiles |
| Service Life | 25+ years matching standard solar panel warranty |
| Operating Temperature Range | -40°C to +90°C (all components rated for outdoor service) |
| Net Weight Per Kit | Approximately 110-130g including all components |
SUS 304 vs SUS 410 — Why Both Stainless Steels Are in This Kit
The kit uses two different grades of stainless steel for the fasteners, which sometimes confuses buyers wondering whether the cheaper grade is being used as a cost-saving shortcut. It’s actually a deliberate engineering choice — each grade is used where its specific properties matter most.
| Component | Stainless Grade | Why This Grade |
|---|---|---|
| M8 bolt + nut + washers | SUS 304 (18% chromium, 8% nickel) | Maximum corrosion resistance, particularly important for the highly-exposed bolt-to-rail connection that’s never accessed after installation |
| ST6.3 wood/tapping screw | SUS 410 (12% chromium, lower nickel) | Higher hardness allows the screw thread to bite cleanly into timber or self-tap through metal. SUS 304 is too soft for tapping operations — threads strip during installation |
Both stainless steel grades resist rust in Kenyan conditions — including coastal humidity — for the full 25-year installation service life. The grade difference reflects functional requirements (corrosion resistance vs hardness for cutting threads) rather than quality differences.
Installation Best Practices
- Survey the roof first. Walk the roof and identify the positions of timber purlins (mabati/IBR) or rafters (tile/shingle). Mark these positions clearly. L-foot positions should align with structural members for maximum pull-out strength.
- Mark all L-foot positions before drilling. Lay out the planned rail positions on the roof, then mark the L-foot positions at 200-300mm from each rail end plus intermediate positions every 1500mm. Verify each marked position aligns with an underlying timber where possible.
- Drill the pilot hole. For wood-screw installations, drill a 4-5mm pilot hole through the roof into the underlying timber. The pilot hole prevents the wood screw from splitting the timber and makes installation easier. For self-tapping installations on metal, skip this step — the self-tapping screw cuts its own hole.
- Position the EPDM gasket. Place the EPDM gasket on the roof at the planned L-foot position, with the gasket’s pre-cut hole aligned to the pilot hole.
- Position the L-foot over the gasket. The L-foot base should sit flat on the gasket with its mounting hole aligned to the pilot hole below.
- Install the wood/tapping screw. Drive the ST6.3×80 screw through the L-foot, through the EPDM gasket, and into the roof. Tighten until the EPDM gasket is compressed to about 60-70% of its original thickness — enough to seal, not so much that the rubber bulges out.
- Assemble the rail attachment. When the rail is installed onto the L-foot, the M8 bolt threads through the rail’s T-slot nut into the L-foot’s vertical leg. Use the flat washer first, then the spring washer, then tighten the M8 bolt to approximately 18-20 Nm torque.
- Verify waterproof seal. Visually inspect each L-foot installation point. The EPDM should be visibly compressed but not extruded out from beneath the bracket. There should be no visible gaps between the bracket and the roof surface.
The “All Roof Types” Advantage
Most L-foot products sold in Kenya are roof-type-specific. There’s a separate SKU for mabati installations, another for IBR sheet, another for tile, another for concrete. Installers running multiple jobs simultaneously have to stock four or five different L-foot variants and remember which goes with which roof type. The Bicity Solar L-Foot Screw Kit consolidates this into a single SKU that works across all common roof types — the only variation is the installation technique (which screw type, whether to use a sub-bracket for tiles), not the components in the kit.
The practical benefits for installers:
- Simplified procurement: Order one SKU regardless of roof types across multiple jobs
- Reduced inventory: No need to maintain separate stock for each roof type
- Faster job-site adaptation: If the roof type changes mid-project (e.g., extending a system from the main house mabati to the outbuilding tile), no separate procurement needed
- Lower minimum order quantities: One product type reaches bulk-pricing thresholds faster than five separate products
Cross-Sell Components for a Complete Mounting Kit
- Solar mounting rails: Our 4800mm rail (industry standard) and 4400mm rail (niche-fit option)
- Rail splices: CP-RS-A 150mm rail splice for joining rails into longer continuous spans
- Mid clamps: Available in 30mm, 35mm, and 40mm profiles for adjacent panel securing
- End clamps: Available in 33mm and 40mm profiles for outer panel edge termination
- Complete bills of materials: Use our solar calculator for a full component estimate, or submit a project quote request for bulk pricing

